To the first codelab of the Embedded Meetup Group Munich
What's the target audience of this tutorial?
Everybody interested in programming C or C++
No previous coding experience needed, but helpful
What is an ESP32?
The ESP32 is a low cost WiFi Chip

Some basics that you'll also learn in this codelab are:
- Git & Github - learn the basics of source control
This codelab will walk you through the process of setting up the environment to compile and program some example code to an ESP32 and start some own development to extend the functionality of the given sample
What you will build
- A sample application using the ESP32
What you'll learn
- How to build / compile and debug a program for a Microcontroller
- How to program a Microcontroller with your compiled code
- How to create and run a task in a Embedded Device
- How to set up a Mesh Network ESP32 Mesh Development SDK
What you'll need
- A ESP32 development board, preferably 3
- A computer running Linux, Windows, or macOS
- A USB cable to connect the dev board to your computer
- A text editor, or the IDE of your choice
- Basic knowledge of C
This codelab is focused on Embedded Code. Non-relevant concepts and code blocks are glossed over and are provided for you to simply copy and paste.
Setting up the Toolchain
Linux (Ubuntu)
or
wget https://dl.espressif.com/dl/xtensa-esp32-elf-linux64-1.22.0-80-g6c4433a-5.2.0.tar.gzand extract
mkdir -p ~/esp
cd ~/esp
tar -xzf ~/Downloads/xtensa-esp32-elf-linux64-1.22.0-80-g6c4433a-5.2.0.tar.gzor
wget https://dl.espressif.com/dl/xtensa-esp32-elf-linux32-1.22.0-80-g6c4433a-5.2.0.tar.gzand extract
mkdir -p ~/esp
cd ~/esp
tar -xzf ~/Downloads/xtensa-esp32-elf-linux32-1.22.0-80-g6c4433a-5.2.0.tar.gz
Set up the build requirements
sudo apt-get install gcc git wget make libncurses-dev flex bison gperf python python-pip python-setuptools python-serial python-cryptography python-future python-pyparsingTo keep the ESP32 makefile system informed about the location of your compiler, you need to export the Compiler Path, you can do it at any time in your open terminal, or add this line to the end of your bashrc at
export PATH="$HOME/esp/xtensa-esp32-elf/bin:$PATH"bashrc file
source ~/.bashrcWindows
Unzip the zip file to C:\ (or some other location, but this guide assumes C:\) and it will create an msys32 directory with a pre-prepared environment.
macOS
Setting up Git
If you have experience with Git and Github already, feel free to jump directly to the next chapter
Linux (Ubuntu)
Install the git package
sudo apt-get install gitSet your git name and email
git config --global user.name "John Doe"
git config --global user.email "john.doe@gmail.com"
Getting the Source Code
Checking out the espressif Mesh Development Kit can be done with following command, be sure to add the recursive option, to check out all the submodules. The submodules also contain a specific version of the ESP-IDF, the common
git clone --recursive https://github.com/espressif/esp-mdf.gitAnd export the path to your mesh development sdk
export MDF_PATH=~/esp/esp-mdfThe sample project will just use the reference to the ESP-MDF and lives along with this tutorial in:
git clone https://github.com/locomuco/esp32-tutorial.gitConnecting the DEV-BOARD to your PC is done with a plain USB cable, the Dev Board holds a FTDI chip, that provides a serial interface to the ESP32.
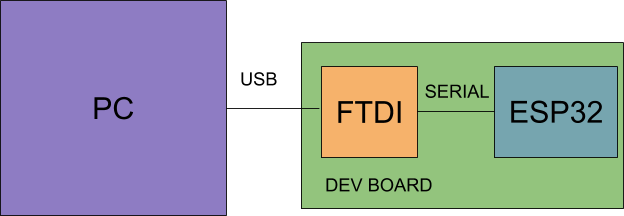
Windows  COM1
Linux    /dev/ttyUSB..
macOS    /dev/cu
sudo usermod -a -G dialout $USERThe Firmware in this tutorial will be built in the checked out esp32-tutorial repo you just checked out.
Build and flash the project by running:
Build your firmware using
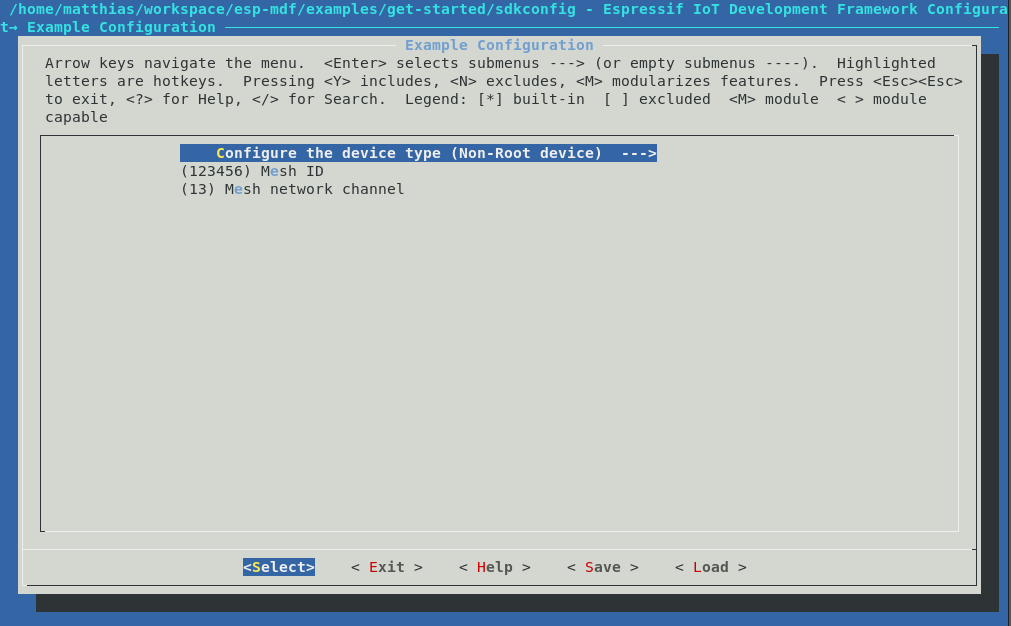
makeThe esp-idf uses menuconfig to apply different configurations, just have a try and look through the different options.
make menuconfig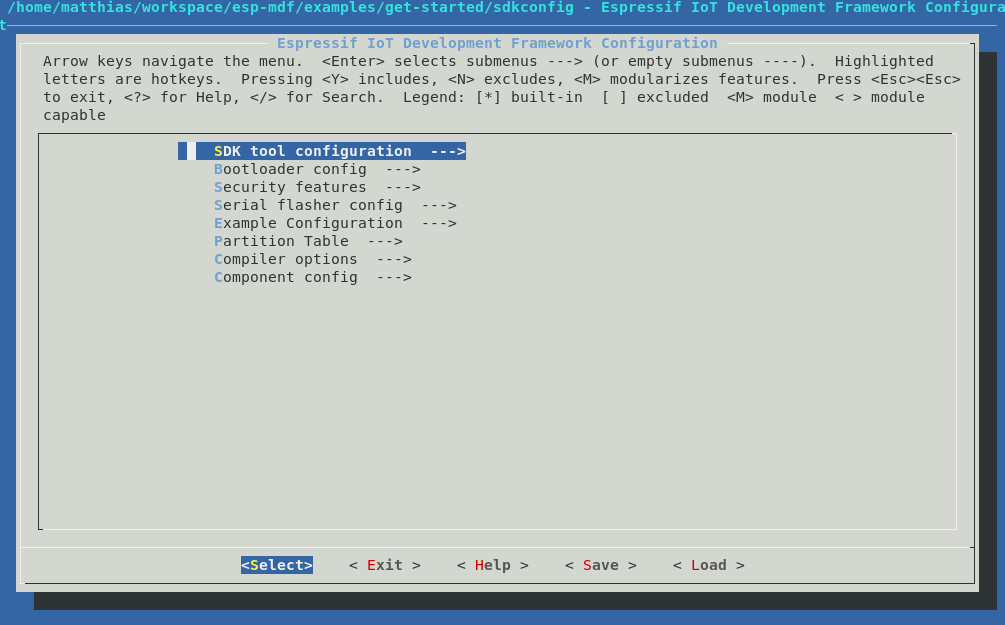
Programming
Programming the device can be done with espressif tools esptools
make flashThis should give you similar output to below
esptool.py v2.0-beta2
Flashing binaries to serial port /dev/ttyUSB0 (app at offset 0x10000)...
esptool.py v2.0-beta2
Connecting........___
Uploading stub...
Running stub...
Stub running...
Changing baud rate to 921600
Changed.
Attaching SPI flash...
Configuring flash size...
Auto-detected Flash size: 4MB
Flash params set to 0x0220
Compressed 11616 bytes to 6695...
Wrote 11616 bytes (6695 compressed) at 0x00001000 in 0.1 seconds (effective 920.5 kbit/s)...
Hash of data verified.
Compressed 408096 bytes to 171625...
Wrote 408096 bytes (171625 compressed) at 0x00010000 in 3.9 seconds (effective 847.3 kbit/s)...
Hash of data verified.
Compressed 3072 bytes to 82...
Wrote 3072 bytes (82 compressed) at 0x00008000 in 0.0 seconds (effective 8297.4 kbit/s)...
Hash of data verified.

Leaving...
Hard resetting...
Debugging
The makefile system also provides command line tools for console debugging, using the command below, you can see UART prints from the ESP32 going from the ESP32 over the serial line to your terminal on the connected PC.
make monitorShould give you following output
MONITOR
--- idf_monitor on /dev/ttyUSB0 115200 ---
--- Quit: Ctrl+] | Menu: Ctrl+T | Help: Ctrl+T followed by Ctrl+H ---
ets Jun  8 2016 00:22:57

rst:0x1 (POWERON_RESET),boot:0x13 (SPI_FAST_FLASH_BOOT)
ets Jun  8 2016 00:22:57
...
But you can also use cat or screen, whatever you prefer
cat /dev/ttyUSB0
Screen /dev/ttyUSB0 <baudrate>
The programming and console baudrate can be changed using menuconfig as described in the previous step, see selection below, this speeds up the development cycle by a few seconds
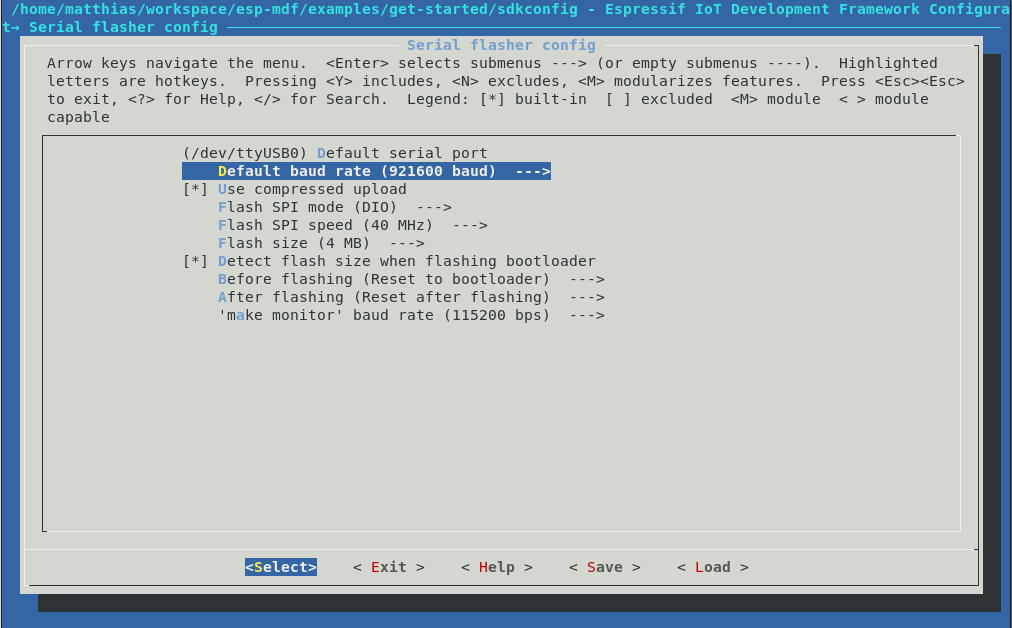
Congrats, you now can do the full compile / program / debug cycle :-)
Hey, what is a thread?
Without an multithreading OS, all commands are executed in a big loop, often referred to the ‘main' loop. When software gets more complex, this approach sometimes cannot fulfill the realtime requirements, since every command is executed sequentially.
Thus you want to set up and execute multiple loops in parallel, and allow them to interrupt each other.
A thread is one of the split out loops containing it's own stack to hold ram content, and it's own priority with respect to the other threads flying around.
OK, how can I create one?
It's pretty simple, just look at the sample below.
static void my_first_thread(void *arg)
{
   MDF_LOGI("I'm running");

   while(1) {
       vTaskDelay(500 / portTICK_RATE_MS);
       MDF_LOGI("I'm performing some periodic action");
       //add more code here
   }
   vTaskDelete(NULL);
}
Now let's see what it's doing:
MDF_LOGI("I'm running");Just prints you the line in your DEBUG output, you can see it using the ‘make monitor' build command
while(1) {
       vTaskDelay(500 / portTICK_RATE_MS);
       MDF_LOGI("I'm performing some periodic action");
       //add more code here
   }
In the next step we see the loop performed in the thread, like the main loop, but encapsulated in it's own scope. The action performed is pretty simple, we're using some FreeRTOS primitive ‘vTaskDelay' to block the task for 0,5 seconds, and print something while unblocked, this runs forever...
To create the thread just use the following given FreeRTOS function. It needs:
- The thread function you just created with the previous code snippet
- a generic name, i used the function name
- The size of the stack, reserved for this thread
- Thread parameters (not used in our case)
- A thread priority, that indicates how important this thread is, compared to the other running ones
       xTaskCreate(my_first_thread, "my_first_thread", 2 * 1024,
                   NULL, 5, NULL);
Let's look, what we have until now:
- We have checked out the ESP32 Mesh Development Kit
- We have built our first sample from scratch
- We have created our first task, that prints something every 0,5 s
OK, now that we can run a task, we want to blink a LED on our DEV board, below is a rudimentary implementation of the blinking LED task.
Don't forget to create your task as described in the previous step
#include "driver/gpio.h"#define GPIO_LED 2
void led_task(void *pvParameter)
{
int blink_count = 0;
int i;
/* set PAD to GPIO mode */
gpio_pad_select_gpio(GPIO_LED);
/* Set the GPIO as a push/pull output */
gpio_set_direction(GPIO_LED, GPIO_MODE_OUTPUT);
MDF_LOGI("LED task is running");
while(1) {
for (i = 0; i < blink_count; i++) {
gpio_set_level(GPIO_LED, 1);
vTaskDelay(100 / portTICK_PERIOD_MS);
gpio_set_level(GPIO_LED, 0);
vTaskDelay(100 / portTICK_PERIOD_MS);
}
vTaskDelay(1000 / portTICK_PERIOD_MS);
}
}The ESP32 mesh architecture consists of a root node, that acts as a gateway to the outside world, you can build this root node, setting the correct option in the menuconfig of the example.
However, we have prepared a root node locally already, so you can concentrate on the nodes only.
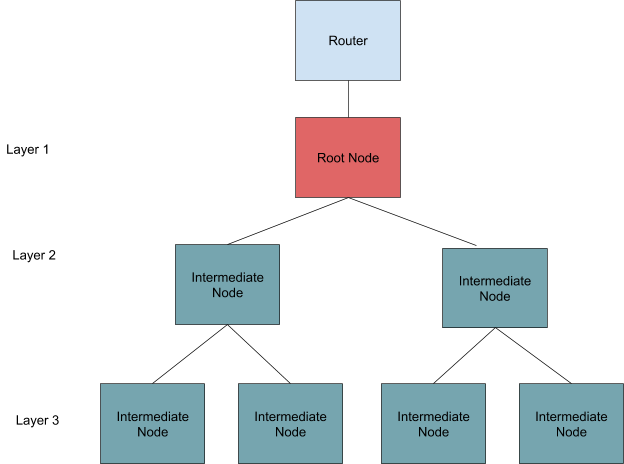
To limit the number of connections, you can set the following option in menuconfig
CONFIG_MWIFI_MAX_CONNECTION=2With this setting applied our network topology will look like the picture below. Each intermediate node can only reach 2 more nodes in the Network
See below he menuconfig option to switch between the different modes
Now we want to use a given Mesh API, to identify in which layer of the mesh we are located at the moment.
#include "mlink.h"esp_mesh_get_layer();Just use this API to update your blink count, and you'll see, in which layer of the mesh you are currently
OK, now that we are all connected in a WiFi mesh - tree, whatever. We want to find out who is who in the network. Therefore the root node is broadcasting a message for a dedicated group of nodes. You're already part of this group.
Your node read thread is already listening, and spitting out messages for that. Look out for following function in the code.
static void node_read_task(void *arg)There is some statement for receiving a packet inside the mesh network
ret = mwifi_read(src_addr, &data_type, data, &size, portMAX_DELAY);After that you can add following code to differentiate group messages from normal messages
       if (data_type.group && data_type.custom == MESH_LIST_MAGIC) {
            /* Interpret group broadcasts as mesh member list */
            print_mesh_node_list((uint8_t *)data, size);
        } else {
            /* Print any other payload */
            MDF_LOGI("Node receive, addr: " MACSTR ", size: %d, data: %s", MAC2STR(src_addr), size, data);
        }
The function to parse and print the payload coming from the root is below
static void
print_mesh_node_list(const uint8_t *buf, size_t buf_len)
{
    if (buf_len < (sizeof(struct mesh_list_hdr) + sizeof(mesh_addr_t) * 1)) {
        /* There should be at least one node (root) in the list. */
        return;
    }

    /* Parse header */
    struct mesh_list_hdr *hdr = (struct mesh_list_hdr *)buf;

    /* Show entries */
    mesh_addr_t *entries = (mesh_addr_t *)&buf[sizeof(struct mesh_list_hdr)];

    MDF_LOGI("Mesh node members:");
    for (int i = 0; i < hdr->num_entries; i++) {
        mesh_addr_t *node = &entries[i];
        if ((uint8_t *)&node > &buf[buf_len - 1]) {
            MDF_LOGW("Node received mesh node list with too short buffer");
            return;
        }

        MDF_LOGI("  " MACSTR "", MAC2STR(node->addr));
    }
}
What you will get is a list of MAC addresses, that are connected to the network. You can now send messages to the other participants using the function below..
void send_msg(void)
{
   mdf_err_t ret = MDF_OK;
   int count     = 0;
   size_t size   = 0;
   char *data    = MDF_MALLOC(MWIFI_PAYLOAD_LEN);
   mwifi_data_type_t data_type = {0x0};

   size = sprintf(data, "Tell <your name> ");
   ret = mwifi_write(NULL, &data_type, data, size, true);
   MDF_FREE(data);
}
While the first argument of mwifi_write is the destination mac (NULL for root)
uint8_t dst_addr[MWIFI_ADDR_LEN] = {0x0};
/* send to root */
mwifi_write(NULL, &data_type, data, size, true);
/* send to node */
mwifi_write(dst_addr, &data_type, data, size, true);
Now it's up to you to find out who's who. Have fun finding out.
Thanks for bearing with us during this codelab....